Quick Saddle Fit
Quick saddle check in 10 proven steps!
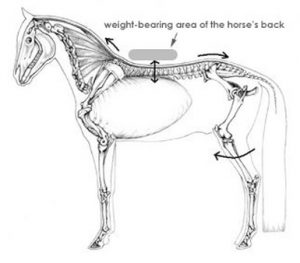
Have your horse stand as square as possible, then begin…
Position the saddle
Put the saddle upon the horses wither and give it a slide back to where it sits “at home”. This is the correct position of the saddle.
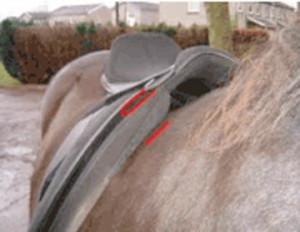
Check the tree points.
The tree points should be running parallel to the horse’s shoulders. The saddle should be approx. 2 fingers (2″) from the scapula. The scapula can retract 4-6 inches depending on the horse. Do keep in mind that usually the flap has plenty of give and that the point position is of most importance.
In the photo, the angle of these tree points run parallel to the horse’s shoulders.
Levelness of seat.
When the saddle is sitting flat on the horse’s back, the deepest part of the seat should appear to be parallel to the ground. If you were to take a pencil or chapstick, place it on the seat of the saddle, it should come to rest in the exact area that your seat bones would be located if you were in the saddle. The deepest point of the saddle should be in the middle of the seat. This can only be evaluated in general since the fit will change once the saddle is tightened and the riders weight is added.
The photo shows a saddle which is too tight and puts pressure on the horse’s shoulder and loins (by tipping the saddle backwards).
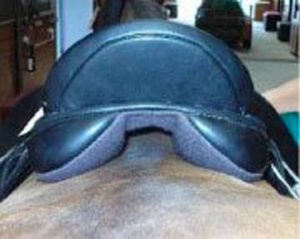
Adequate pommel clearance.
In the past, we have always heard that the clearance needs to be 3 fingers between the pommel and wither. While that is not wrong, it is not always “the word”. In some instances, the clearance may be lower and still be adequate or appropriate. If it were higher, it would more that likely indicate too narrow a tree. The saddle should under no circumstance touch the spine or withers. If the saddle already hits the withers it will be very difficult to fit with the pads. If the tree is too tight and the saddle tilts backwards significantly this cannot be fixed with any pads.
In the photo the saddle is too wide for this horse and tips the rider forward. The added sheepskin half pad clearly did not remedy this situation.
Panel pressure.
Run your hand under the flap (knuckles toward the horse), back towards the stirrup bars (where your leathers attach to the saddle). Is there room to slide your hand in? Or is it too tight, therefore creating pressure? Run your flat hand under the panels (palm toward the horse). In the middle of the panels, is there enough room to put your whole hand in? If so, your saddle is ‘bridging.’ Is it very tight and allowing your saddle to ‘rock’ when you put alternating pressure at the pommel and the cantle? This would mean that your saddle is overstuffed. Does your saddle look like it’s going uphill? Or, does it appear to be falling onto the wither?
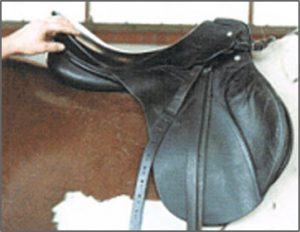
Pommel to cantle relationship.
As you are standing to the side of the horse, with the saddle in the correct position, the cantle should be significantly higher than the pommel. Even on an all purpose this should be the case.
Pressure test: If you are on the left side of the horse, place your left hand flat on the pommel and your right on the cantle. Gently, but deliberately, alternate your pressure from hand to hand and see if the saddle rocks. It shouldn’t.

Check seat length.
With the saddle in the correct position, check where the panels end. They should not extend past the last (18th) rib. In the loin area, there is no solid skeletal structure to properly support the saddle. This area is not designed to carry weight and is very sensitive. It will reduce the movement of the hindquarters and make it virtually impossible for the horse to lift his back and collect.
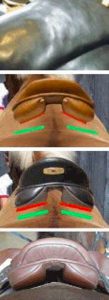
Check the gullet (channel).
As you stand behind the horse, look to see that there is adequate clearance around the horse spine. When through with this observation, take 4 of you fingers and see if they fit comfortably at the rear of the saddle between the 2 panels (about 6 cm). When you take the saddle off the horse, take the same 4 fingers, lie them on your horses spine and check where your saddles panels rest.
A too narrow gullet is very painful for the horse since it presses on the spineous processes and nerves alongside the spine.
A too wide gullet will sink in too deep next to the spineous processes.
The photo shows good gullet clearance with enough space around the horse’s spine.
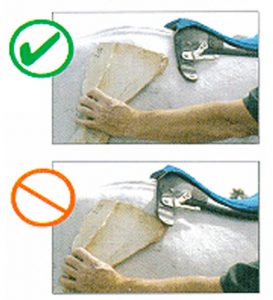
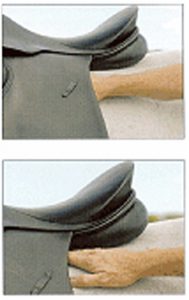
Check saddle panels.
Flip your saddle over and run your hands along the saddle panels. If you feel any dents, lumps or unevenness this needs to be addressed. The panels should also be not too soft or too hard. Saddle panels should follow the shape of the horse’s back.
In the top photo, one can clearly see the lumps pressing through the saddle panel.
In the middle photo, the panels are way to steep for this horse’s back and don’t fit his shape at all. (Photo courtesy of Kitt Hazelton.)
In the bottom photos, the panels follow the shape of the horse’s back. (Photos courtesy of Kitt Hazelton.)
Horse’s response.
This step applies constantly throughout the application of all the above steps. If the horse is chomping his teeth, pinning his ears, trying to kick etc, he is trying to tell us that he’s uncomfortable. Keep this in mind if your horse tries to get away from you as you approach with your saddle. Horse owners should take these signs seriously and have their saddles checked.
Look at your horse’s back without a saddle. Is the topline well muscled? If you see indentations behind the shoulder blade or along the topline it’s time to have your saddle fit evaluated. If there is a swelling on the upper area of the shoulder blade this is can be due to a hematoma (or fat if your horse is overweight).
In checking saddle fit correctly, the saddle fitter should take wither and back tracings for later comparison. They should check the saddle in a static state following all the steps above. Most importantly, to insure a correct fit, the fitter should encourage the rider to be on and make a dynamic assessment.
When the horse is at rest, the back is in a totally different state than during work. What can be observed while the horse is in motion can be invaluable.